JLMahJongg lets you create your own winning hands list (cards) used to play American Mah Jongg. You can define two types of cards: 1) National Mah Jongg League (NMJL) Standard, and 2) Custom (anything else). You can only store one of your own of each card type, standard and custom, at a time. Note that deleting the browser storage (cookies) will delete the card data for the browser version and you will have to enter the card again. Card data for the standard 2025 or 2026 cards can be selected without using the card editor. However, you will not be able to view a standard NMJL card in the app unless you enter it using the card editor. You can still play using your NMJL cards.
The host can send a custom card automatically to other players.
I define a language called Mah Jongg Card Language (MJCL) that is used to enter custom or standard cards into JLMahJongg. This language and how to enter cards are described in this appendix. I have attempted to make the card language match the standard card format as closely as possible. It can take less than 15 minutes to enter a card. Once a card is entered, it is available to view in the app in future games.
A card has 3 things: 1) card name, 2) card categories, and 3) lines in each category. You enter these into JLMahJongg using its Card Editor. Most of what you input defines the lines on the card.
Each line can have either 1 or 2 base patterns that define the winning hands for that line. The base patterns are what you see on a standard printed card. Each base pattern contains sets of tiles. The number of tiles in each base pattern must equal 14, the number of tiles in a winning hand.
Each line contains the following:
- Sets in the hand – each set has a specified number of tile types. Tile types are: numbers 1 to 9; Dragons, D for any suit, or G for Green, R for Red, and 0 (zero, not O) for White; Flowers, F; and Winds, N E W & S. Numbers and dragons have suits that must be specified if the sets are not all the same suit. Flowers and winds do not have a suit, so no suit specifier is needed for these. There can be up to two base patterns on a line that are separated by either the OR character (| “the shift \ on the keyboard”) or the letter o (lower case O). Note that spaces can be used to make the sets and lines clearer, but are not needed.
- Expander codes – expander codes indicate how the base pattern of sets is repeated to generate multiple hands represented by the base pattern. The codes correspond to some of the text in parentheses on a standard card line.
- Exposed (X) or Closed (C) hand indicator (NOTE: X must be upper case)
- Base hand value
Specifying suits. The number of specific suits is specified by indicating each set’s color by preceding it with a letter for the color: green (g), red (r), or blue (b). The default color is green (g) and does not need to be entered if it is the first color. Sets with different colors need to be different suits. Sets with the same color need to be the same suit. The suit starts out as the default, green, if it is not specified. The suit will stay the default until a new color is specified on the line. If a set needs to be specified as a specific suit, it can be preceded by a specific character for the suit (m=bam, c=crak, d=dot). NOTE: Bam is NOT “b” because “b” is used for blue. Specific suits are rarely used on standard cards (other than 0 for white dragons in year sets).
Expander Codes. The expander codes cause the pattern to be replicated according to the expander code (except the default T=These numbers only). This corresponds to some of the wording explaining the line on standard cards. The expander code options are:
T = These numbers only – does not expand (default),
Ichrs = Like singles defined by chrs (the single set marked by the first character in chrs will also be replaced by all the following characters in chrs. For example, INEWS (chrs=NEWS) replaces a single North, N, with the additional winds E, W, and S.
The below expanders work similarly to the above Ichrs for different size sets:
Achrs = Like pairs defined by chrs,
Pchrs = Like pungs (sets of 3) defined by chrs,
Kchrs = Like kongs (sets of 4) defined by chrs,
Qchrs = Like quints (sets of 5) defined by chrs,
Zchrs = Like (any set sizes) – any set sizes defined by chrs, (for example, ZENWS, replace any set sizes of E with the additional winds N, W, and S,
Lchrs = Like numbers (replaces pattern number 1 (or 2 if even numbers) by 1 to 9, or if chrs is “o” or “e” replaces by odd or even numbers only),
Uchrs(e,o) = Unlike number sets (chrs = I, A, P, K, or Q followed by the 2 tile types replaced by the unlike numbers). For example, UK18 means kong sets with 1’s and 8’s replaced by any 2 unlike numbers between 1 and 9). Adding an e or o at the end of chrs constrains to only even or odd sets,
Vchrs = Consecutive run (replaces consecutive number runs starting with 1 (or 2 if even run) by all possible runs up to ending with 9). Can use chrs as “a,” “o,” or “e” for all, odd, or even number runs.
*snum = Wild card for suit on sets in the list given by snum. Note that the set number starts at zero and only sets up to number 9 (single digit set number) can be set as a wild suit (any suit). This expander code is used along with the code, “a” before the sets that can be any suit. This “a” code shows the “wild” sets that can be any suit in color purple. Note: this should be the first expander code if there are more than one.
>chrs = Replace a specific set number with a set of alternate values. The code, chrs, is the set number to be replaced followed by the values to replace. Note that the set number starts at zero and only sets up to number 9 (single digit set number) can be set as a wild suit (any suit).
Ychrs = Replace pairs after the first pair with the specified value. The code chrs can be “o” for odd numbers, “e” for even numbers, or a specific set of values.
Hchrs = Set each of the set numbers in the range defined by chrs to a pair, one at a time. Each of the other sets in the range is set to a single. The first set in the range needs to be initialized to a pair. Following Kongs match the number of the pair.
# = Sets of different numbers are used in any order, regardless of set size. Currently implemented only for 3 different number sets (for example, 3,6,9).
~ = Opposite winds (if have NN and SS, replace with EE WW or vice versa).
!chrs = restrict like numbers, unlike numbers, or a run to only numbers in chrs. Note that this is not a separate expander stage (limited to 2 stages), but modifies a like, unlike, or run stage. This code must come first before any other expander codes.
Examples of these expanders are shown below for the 2026 card. If you are brave enough to try to use our card editor and Mah Jongg Card Language (MJCL) to enter the 2026 card, here are some expander code hints:
2468 lines 6&7: K2468
Any Like Numbers line 3: *4 L
Quints line 3: UQ14
13579 line 4: H01234
Winds – Dragons line 2: *0123
Winds – Dragons line 3: Lo
Winds – Dragons line 4: Le
369 line 5: H123
Current Expander Code Restrictions: I sometimes don’t implement an expander code combination until it is needed for a specific standard or custom card we are supporting. The editor is limited to 2 sequential expander stages. A single first stage can be any of the expander options. The L and Y stages cannot currently have a second stage. The only expanders that can currently be used for a second stage are: K, V, Z, U, ~,*, L, and Y. If two stages are used sequentially, the order should not matter if the above two restrictions are satisfied.
Another constraint is that two adjacent sets can’t use the same exact value and still be separate sets. For example, if there are 2 sets to make the number, 10, the next set can’t be any dragon that can be a white dragon that is also zero. To fix this problem rearrange the set order. The set order is arbitrary for the hands generated and only matter in the order the sets are displayed.
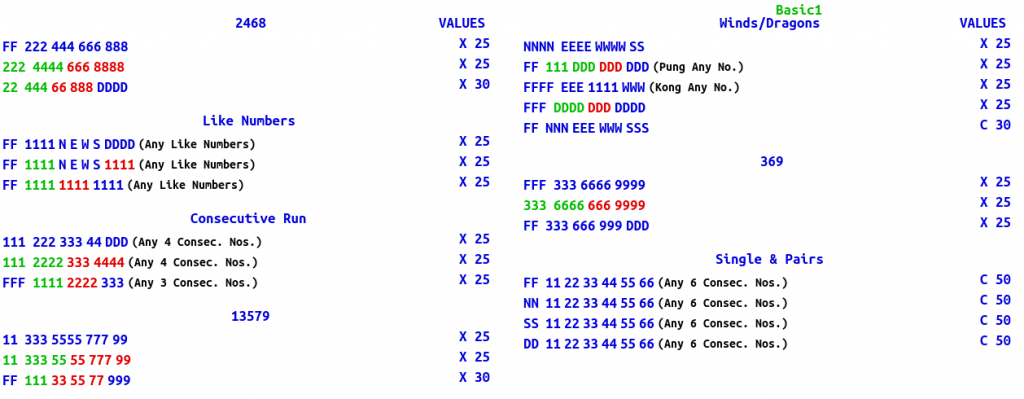
Example Card Definition. Below is the MahJongg Card Language code for the JLMahJongg Basic1 card.
Basic1
“2468”
FF 222 444 666 888 X25
222 4444 r666 8888 X25
22 444 r66 888 bDDDD X30
“Like Numbers”
FF 1111 NEWS DDDD L X25
FF 1111 NEWS r1111 L X25
FF 1111 r1111 b1111 L X25
“Consecutive Run”
111 222 333 44 DDD Va X25
111 2222 r333 4444 Va X25
FFF 1111 r2222 b333 Va X25
“13579”
11 333 5555 777 99 X25
11 333 55 r55 777 99 X25
FF 111 r33 55 77 b999 X30
“^Winds/Dragons”
NNNN EEEE WWWW SS X25
FF 111 DDD rDDD bDDD Va X25
FFFF EEE 1111 WWW V X25
FFF DDDD rDDD bDDDD X25
FF NNN EEE WWW SSS C30
“369”
FFF 333 6666 9999 X25
333 6666 r666 9999 X25
FF 333 666 999 DDD X25
“Singles & Pairs”
FF 11 22 33 44 55 66 Va C50
NN 11 22 33 44 55 66 Va C50
SS 11 22 33 44 55 66 Va C50
DD 11 22 33 44 55 66 Va C50
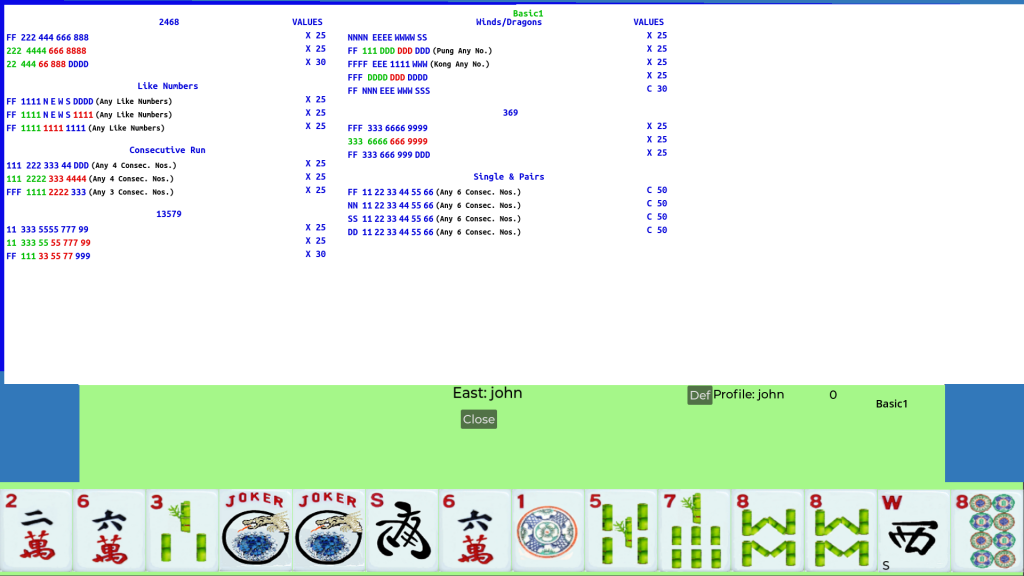
The Basic1 card that this code produces is show in Figure E-20.
Card Editor Interface
The card editor is accessed from Advanced Setup by pressing the “Card Editor” button. The “Card Editor” button will only be available if your skill level is set to higher than “Beginner” and you are not currently in a game (You may need to enable the network).
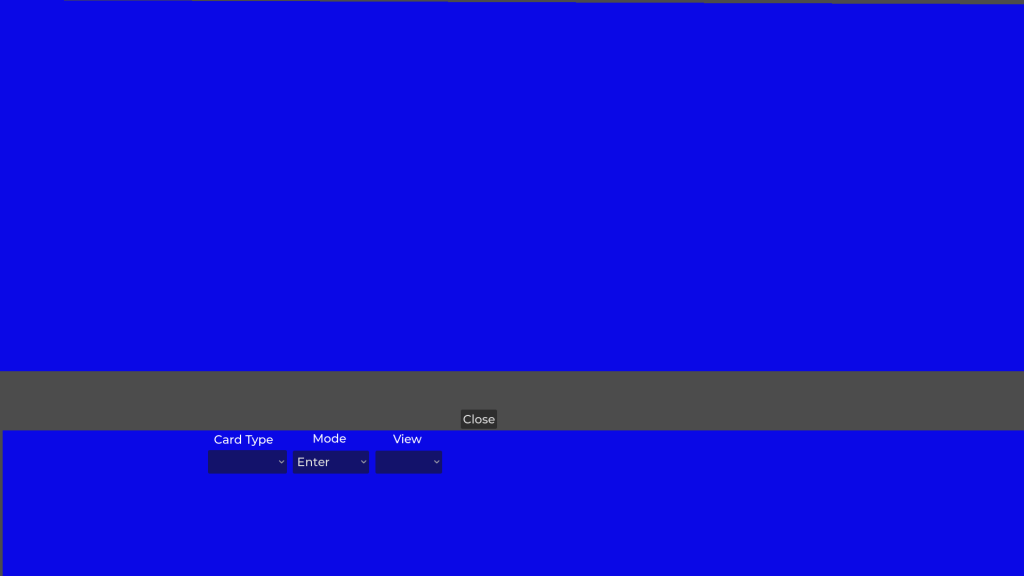
A card editor display will be shown. What is shown depends on the number of previously-stored cards. If no cards are saved (first time using the editor), then a blank editor is shown as in Figure E2. The editor starts with three drop-down boxes:
- Card Type – Either “Standard” or “Custom”: Determines type of card being created or edited.
- Mode – Either “Enter” or “Edit”: Determines if you are entering new categories or lines (Enter) or editing an existing category or line (Edit).
- View – Either “Code” or “Card”: “Code” view shows the MJL code as entered or “Card” view shows what the card will look like when viewed in the game or printed.
Depending on your device type and operating system, your display may not look exactly like the ones shown here. In particular, the drop-down boxes might not show the down arrow on the right indicating it has a drop-down menu. Even if the arrow is not shown, you can still click in or select the box to show the menu.
The “Close” button in the middle closes the editor window and returns to the lobby.
To start entering a card, first select the card type from the “Card Type” drop-down box. You can select either Custom or Standard. Figure E3 shows the display after selecting a standard card. The process for entering and editing standard and custom cards is the same.
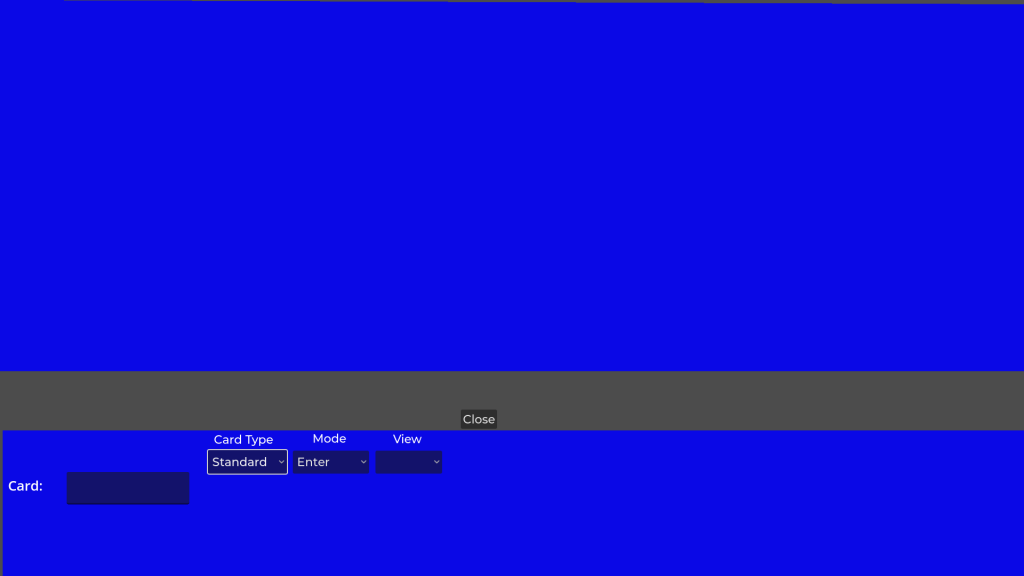
Next enter the card name in the Card box and press Enter. For this example, we show starting to enter a “2024” card. The display after entering the name is shown in Figure E4. Note that the editor mode is set to “Enter.” The “Enter” mode is used when adding new categories or lines to a card.
Note that a card editor version number (v2, for example) is automatically added to the end of the card name. This is so old cards that might not work with new editor code can be deleted and recreated automatically. In addition, a bonus point value can be added to the end of the name to specify that non-concealed hands that get Mah Jongg without exposures score bonus points (Big Card).
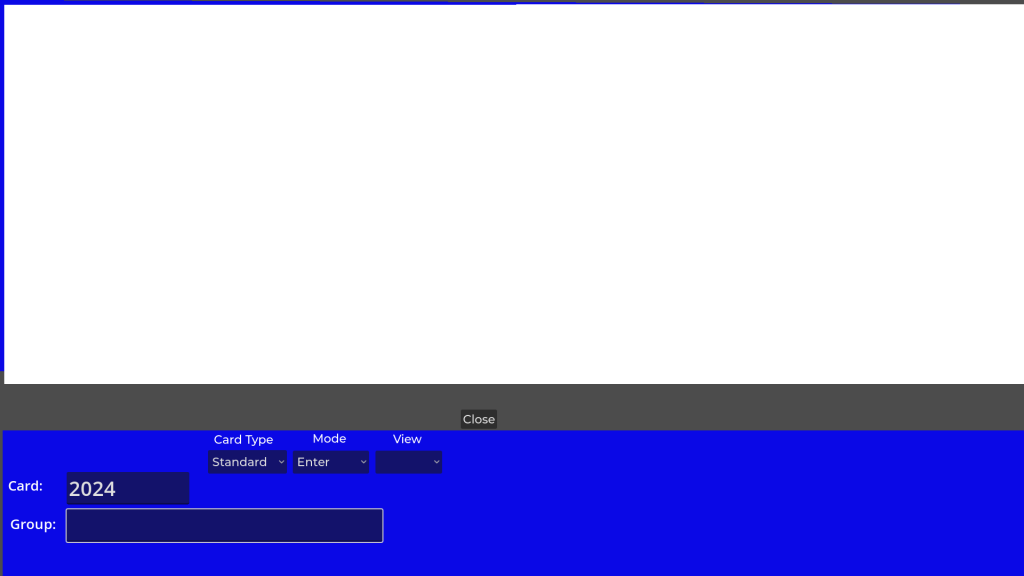
Next enter the first category name in the Category box and press Enter. The first 2024 card category is called “2024” and is shown entered in Figure E5.
To make the category start on a new page, put a “^” character at the beginning of the category name.
The editor mode has automatically changed to “Edit.”
Also, the “View” has automatically been set to “Code.” There are 2 view types: 1) Card, and 2) Code. The Code view shows the Mahjongg Card Language code as you have entered it. The “Card” view shows how the card will look when formatted for display/printing or during play. You can switch between Code and Card view at any time using the drop-down box under “View.” You can use either view, but Code view is more useful for creating or editing a card.
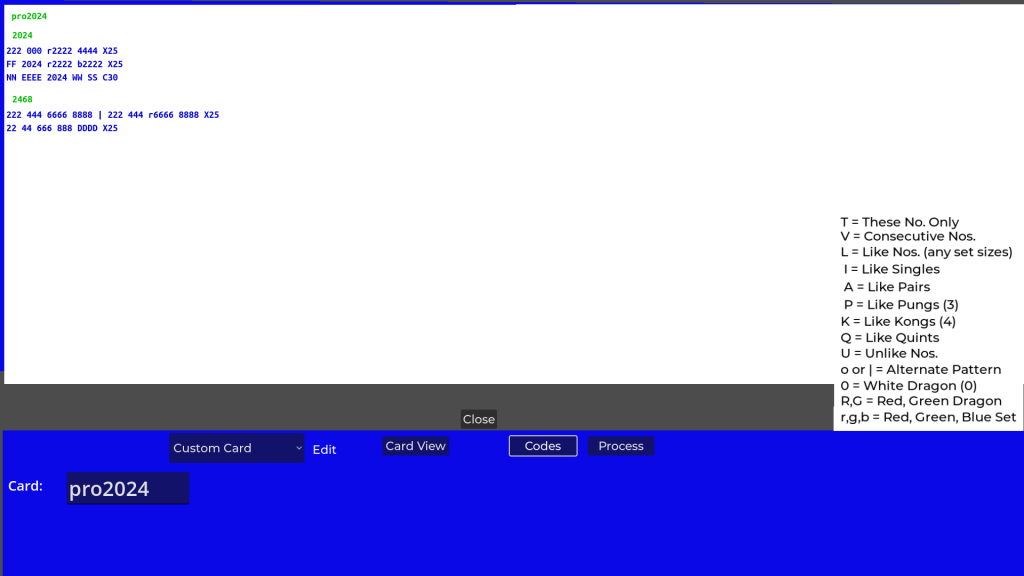
Buttons named “Codes” and “Process” buttons are now shown. The “Codes” button pops up an expander code list. An example is shown here. The “Process” button evaluates the card and generates the number of unique hands defined by the whole card, each category, and each line. These values are displayed when a line is selected if the card has been processed. You only need to use the “Process” button if you want to see these card statistics. An example is shown here. The “Process” button is shown here because you can see the card statistics for this 1-line card. A card with a single category and line is a valid card.
When the new category name is entered, the category and a default line are shown in the card display at the top. The default View when entering a new card is “Code” view. The purpose of the default line is to make sure you can select the 2024 category. Only lines can be selected, not categories. To select a category, you must click on a line in that category. Therefore, all categories must always have at least one line. If a category without a line were created and then a different category was selected, it would not be possible to edit or delete the empty category, and you would need to delete the whole card and start again. The default line prevents this potential problem. The default line is “FF NNNN EEEE WWWW X25”. When the new category is entered:
- The selected category and a blank line are shown in the “Category:” and “Line:” boxes, respectively.
- The empty Line: box is selected so it is ready to accept a new line.
- The Code display shows the new category and line in red, indicating they are the current selection.
- Buttons called “Delete Line” and “Delete Category” are now shown.
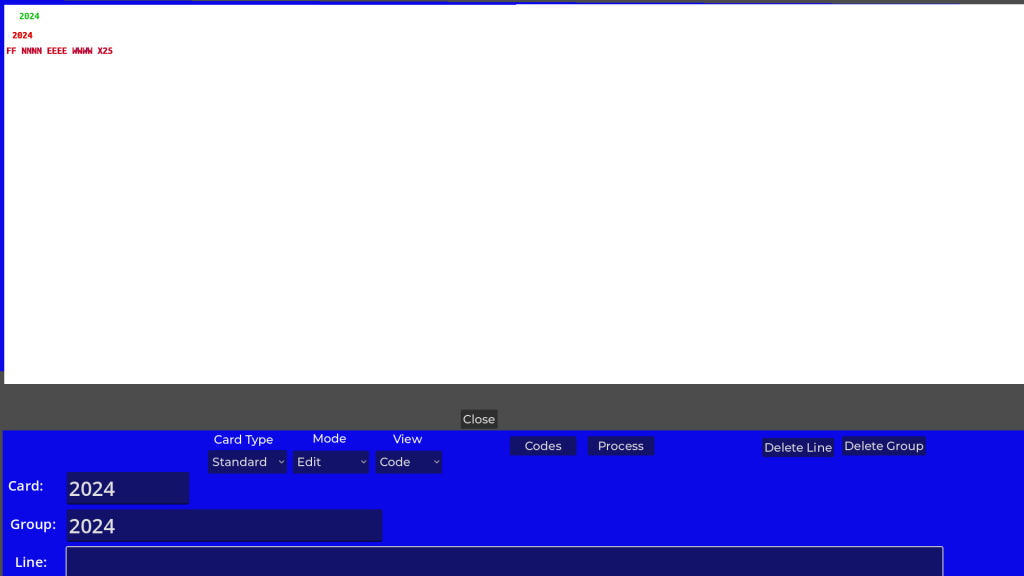
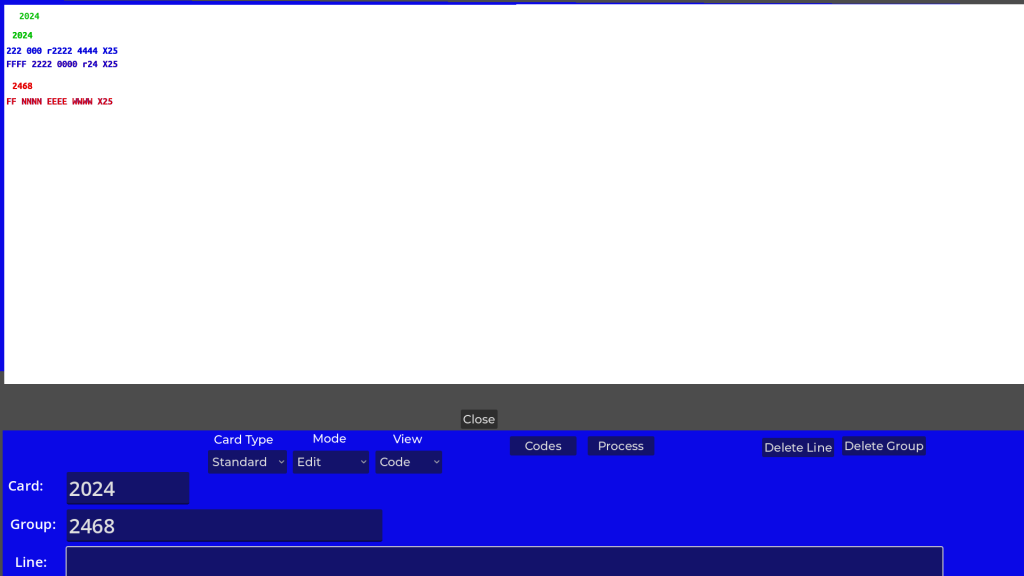
The default line is not what we want, so we need to change it to the actual first line. You just need to enter the line you want to replace the default line and press Enter. The resulting display before pressing Enter is shown in Figure E6.
Because a specific line and category are selected, they can now be deleted, if desired. If there is only one line in a category, deleting the last line deletes the category.
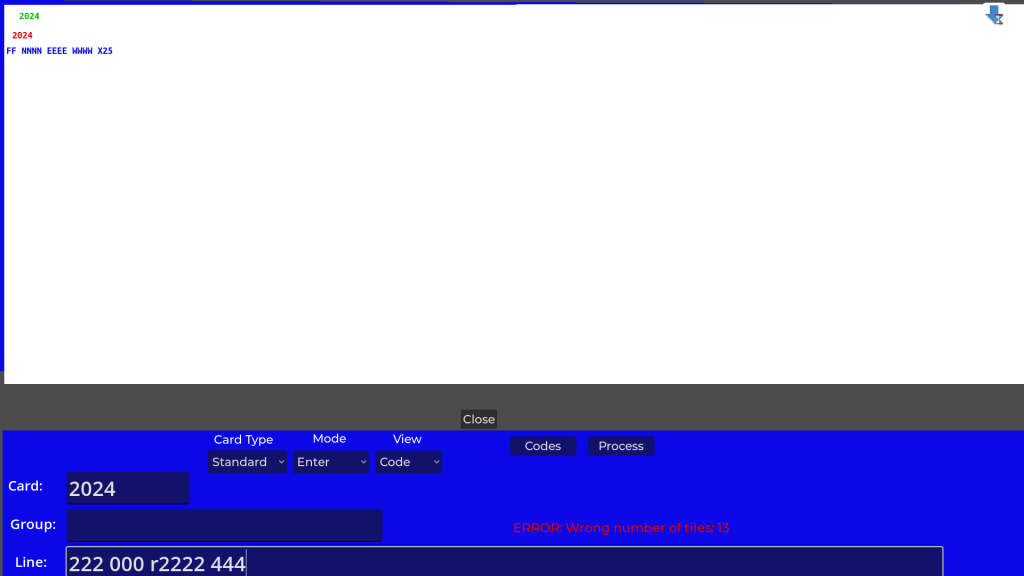
We need to change the default line to the actual first line of the 2024 category on the 2024 card. This first line is: “222 000 r2222 4444 X25”. The only difference between this code and the actual line on the card is that the letter “r” is used to indicate the sets following the “r” are red (they are printed in red on the physical card). The “X25” on the line is the default, so that does not need to be typed in.
Figure E6 shows this correct first line typed in, but not entered yet. Figure E6 is before the line is entered by pressing Enter. You can modify the line until you enter it.
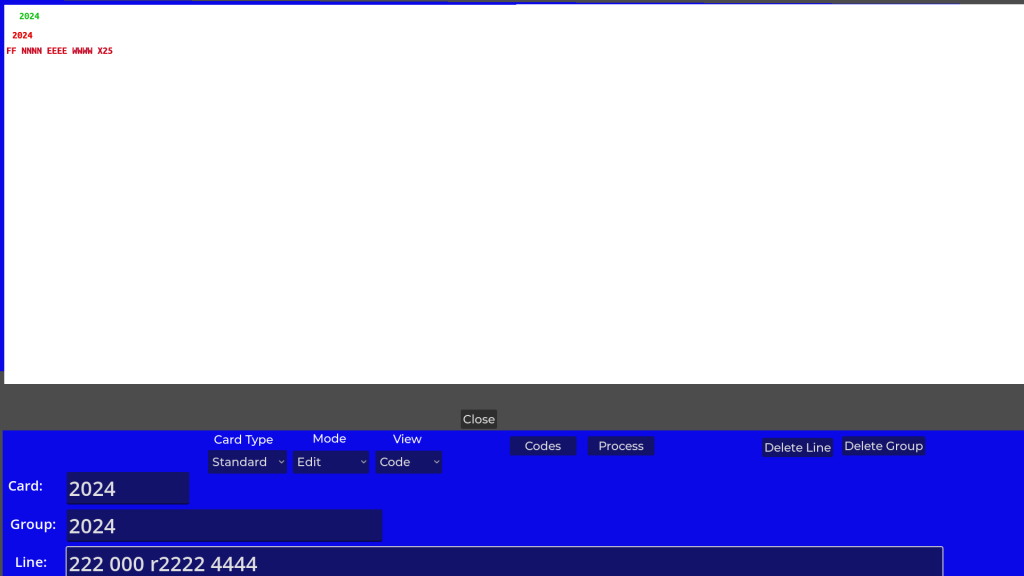
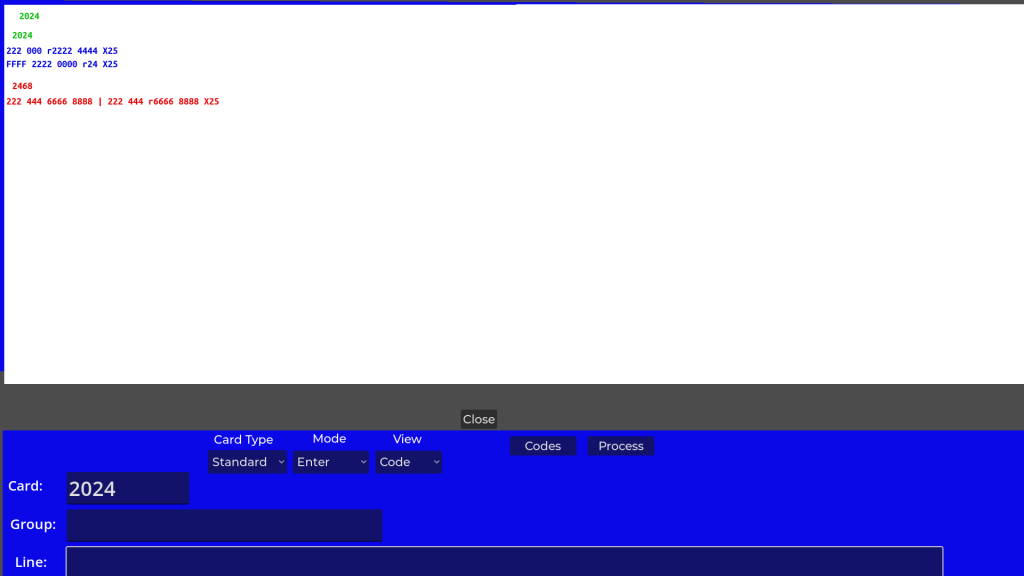
Figure E7 shows the display after entering the first line shown in the “Line:” box of Figure E6. The correct line is now displayed in the Code view, the mode returns to Enter, and the “Line:” box is cleared. The editor is now ready to accept additional lines for this new category.
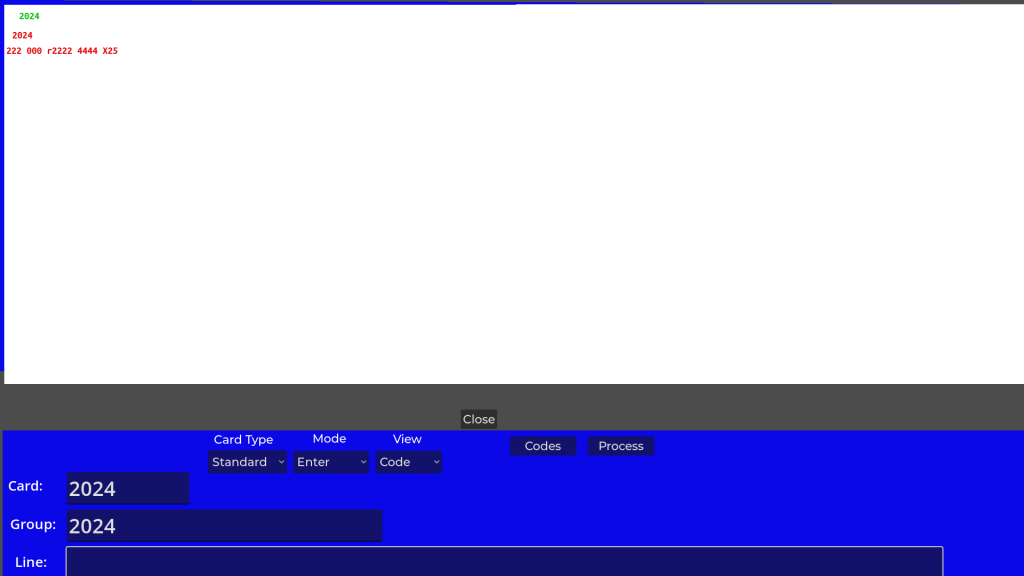
You can continue entering more lines by entering additional lines in the “Line:” box. Note that after each new line entered, you need to click again in the “Line:” box before entering the next line. (I haven’t figured out how to fix this yet.) We’ll show adding the 2nd 2024 category line, “FFFF 2222 0000 r24”. The resulting display is shown in Figure E8.

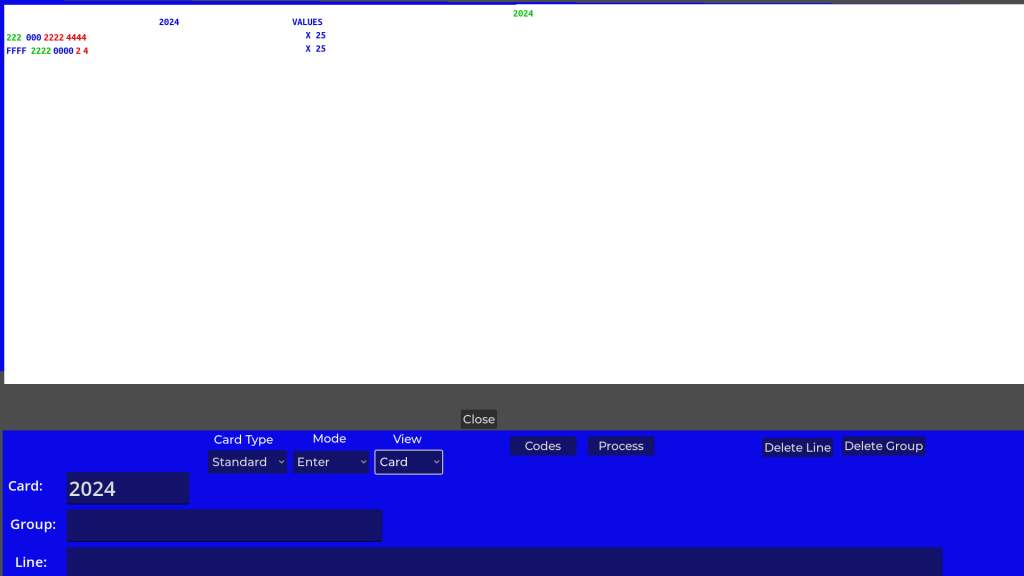
If you select the “View” drop-down and then select “Card”, the display looks like Figure E9. The card view looks like a printed card would look. The sets are shown with the correct colors that indicate how many different suits are used.
This “Card” view for the card in use can be popped up during a game using the menu option “View Card”.
The other thing you need to do to enter a new card is add additional new categories. Without adding the rest of the lines for the 2024 category, we’ll show how to add the next category, “2468”. You can do this in either view, but we recommend entering new code in “Code” view. When in the Enter mode and the last line is selected (as in Figure E8), to enter a new category at the end, add the new category name in the “Category:” box. You can only enter either a new category or a new line – you can’t enter both a new category and a new line at the same time. To enter the new category name, click in or select the “Category:” box and enter the name, “2468” in this case. Press Enter to enter the new category name and create the new category. The result is shown in Figure E10.
As in the first category, type the first line of the second category and press Enter. The result is shown in Figure E11.
To finish adding the rest of a new card, repeat the same steps above until all categories and lines are entered. When you are done, just close the editor. The card is automatically saved whenever you make a change. The card will be automatically processed, if necessary. What you see in the View display is what is stored.
General notes about using the editor:
- The card is automatically saved every time you make a change.
- The “Codes” button pops up a reference list of expander codes
- The “Process” button calculates how many unique hands are produced by each line. After processing is complete, the editor will show the number of unique hands generated by each line, category, and the whole card. To see these numbers, select a line. You don’t need to “Process” unless you want to see these card statistics.
- Most line entries can be entered in either lower or upper case with the following exceptions: X for eXposed needs to be upper case and x for multiply needs to be lower case; o for odd is lower case, e for even is lower case, E for East is upper case.
- The X or C designating either an eXposed or Closed hand and the hand value default to “X 25.” You only need to enter these if they are different than the default.
- Press the close button to close the editor window and return to the lobby.
- The “Line:” box must be reselected after each new line is entered.
Starting the Editor with an Existing Card to Modify the Card or Correct Mistakes
When the editor starts with one (standard or custom) saved card, the editor shows that card. When the editor starts with two (standard and custom) saved cards, the editor shows the standard card. You can switch to the other type of card using the Card Type dropdown.
An example after opening with an existing custom card is shown in Figure E12. The editor opens in Edit mode and Card view. There are 3 things you can do to an existing card:
- Change or correct an existing category, line, or the card name
- Add a new category or line
- Delete a category, line, or the whole card.
The following describes editing an example existing card named “CardEx”.
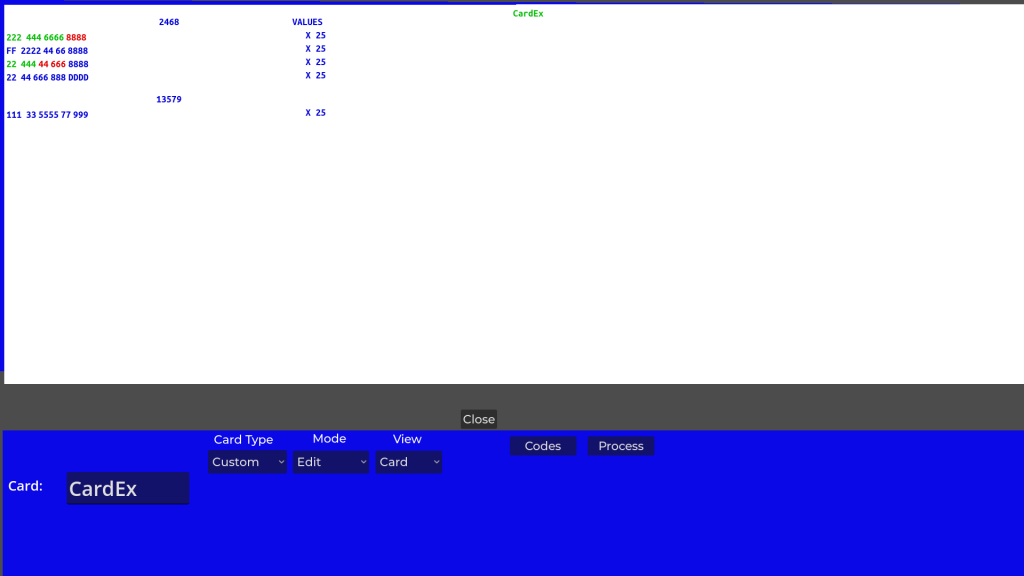
Changing a Category or Line
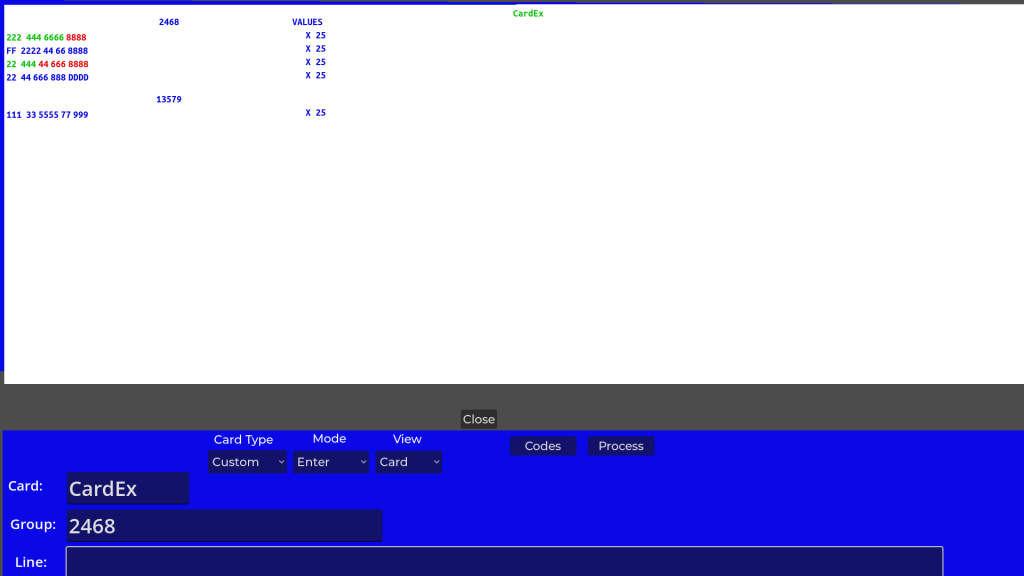
To change an existing category or line, first select the category and line either by selecting the left set when in card view or the line when in code view. If you select the third line of the 2468 category, the card display is shown as in Figure E13. The selected category and line are shown in the Category: and Line: boxes.
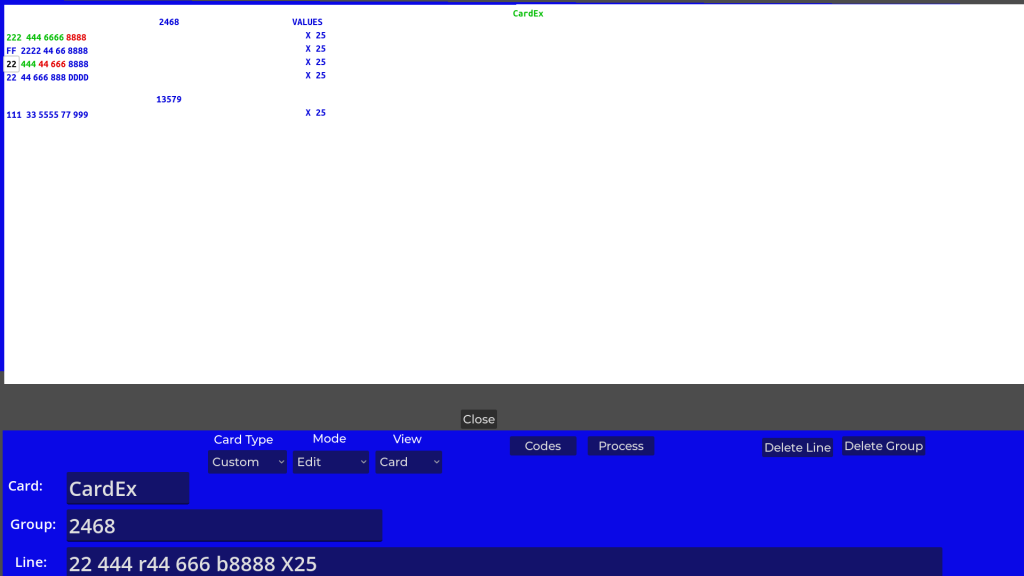
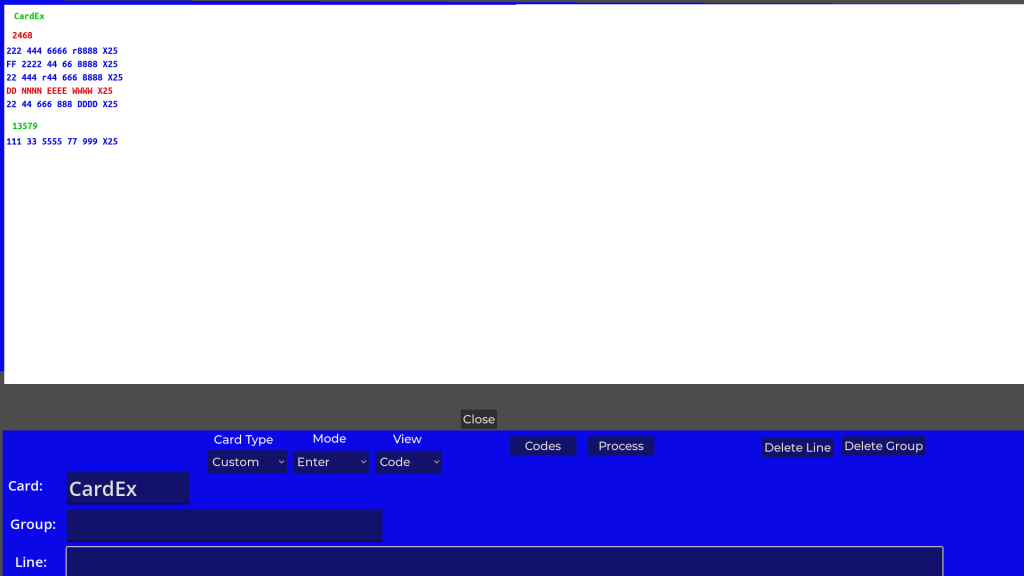
For example, if we want to make the blue 8’s in this line red, we can remove the “b” before the 8888 in the line code. To do this just edit the text in the “Line:” box and press Enter. The display changes to that shown in Figure E14. The blue 8’s in the third line are now red.
After entering the change, the editor is ready to enter a new line after the changed line. In the Card view, you can no long see which line is selected until a line is selected again. If you enter a new line at this point, the editor will switch to code view and show the new selected line in red.
Changing the Card Name
To change the card name:
- Enter the new card name in the “Card:” box and press or select Enter.
Entering a New Category
To enter a new category:
- Select the last line of the last category for a category at the end or select any line in the category after where you want the new category otherwise,
- Change to “Enter” mode with the Mode drop-down box,
- Type the new category name in the Category: box and select or press Enter,
- Modify the placeholder line, “FF NNNN EEEE WWWW”, that is added with the new category.
Entering a New Line
To enter a new line:
- Select the line before where you want the new line
- Change to enter mode with the Mode drop-down box,
- Type the new line in the Line: box and select or press Enter.
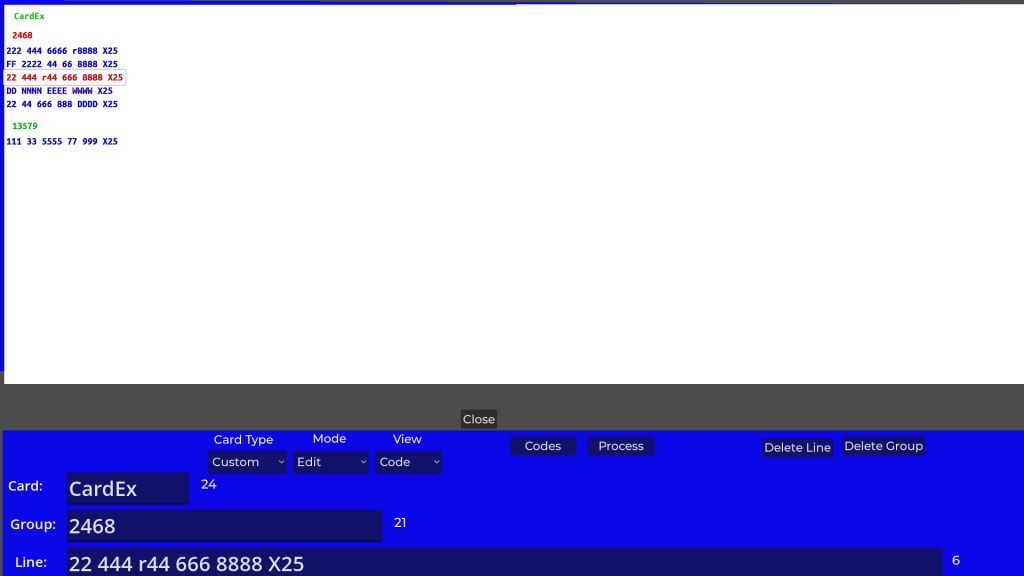
Figure E15 shows the display after entering “DD NNNN EEEE WWWW” as a new line in the middle of the “2468” category. Note that this line was entered manually, not as a new category placeholder line.
If done with this card, press the “Process” button. The “Process” button converts the card code into a form that the app can load quickly and generates statistics about the card. When processing is complete and a line is selected, the number of unique hands defined by the card, the selected category, and the selected line are shown as in Figure E16. In this simple example, there are a total of 24 unique hands defined by the card, 21 by the 2468 category, and 6 by the selected “22 444 r44 666 8888 X25” line. This selected line corresponds to 6 unique hands because there are sets which must have 2 different suits out of the 3 possible suits (bams, craks, or dots). The 6 possibilities are: 1) bam, crak, 2) crak, bam, 3) bam, dot, 4) dot, bam, 5) dot, crack, 6) crack, dot. Note that swapping the suits (bam, crak vs crak, bam for example) is not the same hand because the 1st suit tiles, 22 444, are not the same as the second suit tiles, 44 666 8888. If the tiles for the 2 suits were the same, this would be considered only 3 unique hands.
The Codes button pops up the expander codes you can use in the line definitions. The Codes Summary popup is shown in Figure E17. The popup also lists a few other codes (“OR” alternate pattern code, dragon codes, and suit codes) at the bottom.
Deleting a Line, Category, or the Whole Card
To delete a line, select the line with the mouse (or by touching it on a touch screen). Click or press the “Delete Line” button to delete the line. If the line is the last line in a category, the category is also deleted.
To delete a category, select any line in the category you want to delete. This selects that category. Click or press the “Delete Category” button to delete the category. Deleting the last category will delete the card.
To delete a card, select the card by selecting the card name at the top of the editor display. Click or press the “Delete Card” button to delete the card. If you are using the browser version of the app, NOTE: clearing the cache will also delete all saved cards, in addition to your profiles.
Notes on making changes and correcting mistakes:
- You can select a line in code view by mouse clicking or pressing on a particular line. This makes that line/category the current line and enters the “Edit” mode. The line and category selected will be shown in the Line and Category boxes. You can then edit either the line or the category. After making a change to the line or category, press enter in the line or category box. The editor will automatically return to enter mode and will enter new lines after the currently-selected line. To add new lines at the end, select the last line and change back to “Enter” mode using the mode dropdown. To enter a new category at the end, first select the last line, then change back to “Enter” mode and type a new category name in the Category: box.
- You can delete a category or line by selecting a category/line and then pressing or selecting the “Delete Category” or “Delete Line” button. Deleting the last line of a category deletes the category.
- You can also get back to “Enter” mode by selecting the line where you want to enter (after), then entering that line without any changes.
- To select a line in Card view, you must select the first set on the left.
- To select the whole card, click on or press the card name at the top. A “Delete Card” button is then shown. Pressing it will delete the card with no warning.
- New lines added in edit mode are inserted after the selected line in a category. To insert a line before the first line in a category, you need to insert it after the first line, delete the first line, then re-enter the line you deleted after the new line.
- New categories are inserted before the currently selected category unless the last line of the last category is selected (end of card), then the category is inserted after the last category.
- Categories are selected by selecting any line in the category. If a new category is inserted before other categories, a placeholder line with the tiles “FF NNNN EEEE WWWW” is inserted. This is to ensure that the category can be selected. You can’t select on the category name to select it – you must select one of the category’s lines.
- You can change the line and category text to be entered in the Line and Category boxes until you enter it (select or press Enter).
- Any changes you make are automatically saved.
- The editor checks the number of tiles in each hand every time you enter a new line. If you enter a hand that does not have exactly 14 tiles, an error is output on the display indicating the wrong number of tiles (not 14). The hand is not entered until the line is corrected to have 14 tiles. No other error checking is performed. Figure E18 shows an example error after trying to enter only 13 tiles.
Viewing and Printing a Card
A custom or standard card entered with the card editor can be viewed during a game by selecting the “View Card” option from the game menu. Any cards included with JLMahJongg can also be viewed. An example of the Basic1 card viewed during a game is shown in Figure E19.
To print a card:
- Perform a print screen operation with the card displayed as in Figure E19. In Windows you can press Fn + Print Screen (keys in blue) and choose “Rectangle” from the dropdown at the top. Select the card area on the screen that you want to print (dragging a rectangle). Note: I must do the print screen 2 times in a row to get the screen to copy to the clipboard.
- Paste (cntrl V in Windows) the copied card into an app, such as Microsoft Word, that can print.
- Print the file
An example of a card copied in this way is shown in Figure E20.